Welcome to Stop #5 of our Creative Memories Halloween Blog Hop!
Isn't Halloween fun? I love being a part of this blog hop with my fellow CM Content Contributors - what a creative group of ladies! Today I am going to share some ideas I came up with a few months back that I hope you will be able to use yourself. My projects are pretty simple if you have the right tools (and I try my best to use scraps so nothing gets wasted!) Today we are going to work on some spooky Halloween faces and a two page layout featuring "Spooky Eyes." Let's get started!
 |
| Spooky faces using CM cardstock, the Shape Maker System and scraps from the Border Maker System's Film Strip cartridge |
 |
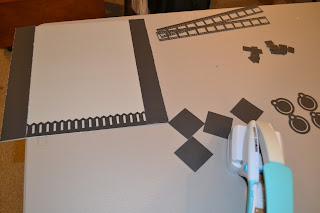
| A fun layout using CM cardstock, jewels from the Floral Embellishment kits, Gold ABC/123 letter stickers, and the fence that comes with the Border Maker System |
1. Spooky Skeleton and Spooky Pumpkin
To get started, you will need the Custom Cutting System's mat and the green blade, a tape runner, and the Jumbo Hexagon Pattern. You will also need the Shape Maker System with the Square and the Fancy Circle cartridges and the Border Maker System with the Film Strip Cartridge. For paper I used our Shades of Bright and Shades of Neutral Cardstock packs to get my orange, black and white cardstock (one sheet of each.) Right now Creative Memories also has for a limited time 10 sheet packs of White and Black cardstock (not a bad idea - I know those are two colors I use a lot of!)
 |
| The CM custom cutting system, blades, mat and tape runner |
 |
| Creative Memories tools: The Border Maker System and the Shape Maker System |
 |
| "Shades of" cardstock packs and Flower and Jewel Embellishments |
 |
| One sheet each of black, white and orange cardstock |
Begin by using your Green blade to make the smallest hexagon possible with the inside of the Jumbo Hexagon Pattern. Do this with both the Orange (the pumpkin) and the White (skeleton) cardstock.
Next, take your black sheet of cardstock and make two film strip borders. Save the scraps!
Finally, using the Shape Maker System and the rest of your sheet of black cardstock, make four Fancy Circles and two squares. Cut the squares in half to make triangles.
Assemble the pieces you have cut as follows - the Fancy Circles are the eyes, the triangles are the noses and the cheekbones, and the rectangles that were the scraps from the film strip cartridge border become the mouths. Adhere with your tape runner and voila, you have a Spooky Skeleton and a Spooky Pumpkin!
 |
| Spooky faces using CM cardstock, the Shape Maker System and scraps from the Film Strip cartridge (used with the Border Making System) |
2. Spooky Eyes
My second project came from being the mother of two boys. I loved the paper flowers and the jeweled embellishments, but struggled with how I could use them for my pages. After staring at the adhesive jewels I realized they could be used as spooky eyes staring out from the dark and that is what I did to create this fun layout! I used a sheet of grey cardstock from the Shades of Neutral cardstock pack - the black picket fence from the Border Maker system and the Gold ABC/123 letters as a title added a little something extra!
I hope you are enjoying all of these fun ideas for your Halloween pages. Now it's time for you to go see what Diana has brewed up for you at Stop 6 on this Blog Hop, Diana Brinsley's blog. If you started at my blog but want to see the previous Halloween ideas, here are all the links:
Enjoy the rest of the blog hop and as always, keep scrappin'! Fran


