Showing posts with label Holiday. Show all posts

Wednesday, November 25, 2020

CLS Fall Blog Hop Stop 6


Thanksgiving is tomorrow, but have you scrapped your Halloween photos yet? Halloween is one of my FAVORITE holidays, and going back to childhood I have had a LONG tradition of dressing up (with many of mine and my boys' costumes thanks to my Mom who is a wonderful seamstress.) This year we had to change things up a bit so instead of going out to find the fun, we kept it in our own home. Instead of trick or treating in various neighborhoods around town, we made spooky food, ordered a fog machine and decorated our house to the nines for a fun night with my parents! Here is what I came up with to celebrate these special memories - instruction sheets are at the end of the post. Enjoy! 

A Spooky House with Doors and Windows!


How Did I Do It?


I hope you can use these ideas in your own books and know that this is just one of many WONDERFUL fall-themed ideas on our blog hop today!  Hop along with us and follow these links to see all of the blogs of the Creative Life Scrapbooking team members:

 Stop 1: Krista French

 Stop 2: Meggan Jacks

 Stop 3: Karyn McDermaid - Rolfe

 Stop 4: Diana Brinsley

 Stop 5:  Tessa Chapple

 Stop 6 : YOU ARE HERE!  Fran Allen Smitherman

 Stop 7:  Noreen Smith

 Stop 8:  Lisa Brown Graham


Wednesday, February 3, 2016

Valentine Blog Hop Stop Number 6!


I love Valentine's Day! The colors are gorgeous and the sentiments are warm (plus you can always make pretty scrapbook pages about holidays!) Whether you love Valentine's Day or you hate it, love is something to celebrate, and it can come in many forms. Just to be a bit different, I will focus here on pages that have nothing to do with romance so we can "think outside of the box" with the CM Group's new Watercolor Love collection. Love for a child or a pet, love of a holiday, love of life, love of travel, love of your grandparents, love of a hobby that fills your soul - it's all a part of our life and should be celebrated. Celebrate with me and this beautiful new CM Watercolor Love paper and embellishments collection!

1.) Love of a child!

The floral paper looks gorgeous with black and white prints - this is actually one of my favorite baby pictures of myself (and the reason I chose to have hydrangeas in my wedding!) What black and white photos do you have that could be used with this paper pack?


What do these circles look like to you? They looked like cake pops to me, so I actually cut a few out to make some homemade cake pops to help tell the story here. Being an older brother is tough and sometimes it's hard to share Mom and Dad's attention. Little C had been having a rough week so I made the spontaneous decision to pick him up after school while his brother had another engagement and take him to Starbucks for some "one on one time." I love this memory, and the Watercolor Love paper combined with CM's brown cardstock look really sharp together! The hearts on the journal box are actually "scraps" from the new Heart Chain Border Maker cartridge - aren't they the cutest?  


2.) Love of a holiday or of a time of year!

I have my own "girly" tree in the dining room, full of pink Victorian bows and ballet dancers - it is my pride and joy and a leftover from my "single days" before my house was outnumbered by fellas! I thought the red plaid paper combined with the new Heart Chain cartridge worked well together. Who knew you could highlight Christmas pictures with Valentine's paper? :) 


3.) Love of a time of year

I am excited about our new Year in Review stickers and embellishments, and I used those here to make a nice "almost summertime" page with lemon and watermelon slices cut using our recently-introduced circle patterns. It is so nice to have such great tools at our disposal. Brotherly love and the beginning of summer, all in one page with our lovely new paper and our cardstock.


4.) Love of your pets! 

Before the children, our pets are our babies (and in many cases they still are!) Tom and Socks actually got a mention at our wedding  (a funny surprise to us and something we will always remember.) They deserve scrapbook pages of their own (actually, I think they deserve entire SCRAPBOOKS, don't you agree?) The pink Watercolor Love paper and border strips are nicely offset by the green punch at the bottom (reminiscent of grass to highlight the pictures of Tom and Socks outside.)

5.) Love of a hobby!

Okay, I cheated here - this isn't Watercolor Love (but it does feature CM's "Shades of Pastel" cardstock, our new Music Notes Border Maker Cartridge, and a title cut from the new Fresh Picks collection's Slide In Pack!) Before my husband, before my children, my love was and still is ballet. Our dreams and our hobbies are what makes us who we are, and love is a state of mind. And I love these black and white photos!


What do you love? Document it and keep celebrating that wonderful life of yours!  

There's still  one more stop in this blog hop but if you are loving what you are seeing so far then plan on tuning into Facebook and joining the Creative Memories Virtual Crop on Saturday, February 6, 2016 where we will be giving out even more ideas (and prizes!) For more great ideas today please hop on over to Noreen's blog for the final stop of today's Valentine Blog Hop (and I have included the links to the other blogs below in case you started here with mine and want to see what you may have missed!) Hope you've been inspired and as always,  keep scrappin'! Fran


Thursday, November 5, 2015

Holiday Blog Hop Stop # 4

Welcome to our Holiday Blog Hop featuring Creative Memories' wonderful new holiday products (and maybe a few old favorites!) If you arrived here from Lisa's page and the other Content Contributors' blogs, aren't the ideas wonderful so far? If you are starting here with mine, be sure and check out all the other blog posts (listed at the bottom with links) because they are INCREDIBLE.

 I just received my shipment of the new papers, slide in packs and stickers and they are absolutely gorgeous - I am already counting the days until my 14th annual Holiday Open House so I can show them off!

Creative Memories' 2015 Holiday Papers, Stickers, Slide-In Pack and the Evergreen Cartridge for the Border Maker System


Nothing highlights beautiful papers like fresh ideas so I have come up with some quick and easy ones to share with you today. I hope you enjoy them and find some inspiration to knock out some pages of your own!

 1.) Split your stickers in half!

Have you ever wanted to fit more pictures on your page but worried that some of your larger embellishments might take up too much room? Have you ever tried splitting them in two? This is a trick I love to use to make easy and fun borders with 12X12 paper.

Select two coordinating sheets of Creative Memories double sided paper or cardstock. Start by cutting one strip slightly wider than another, then adhere one to the other, centered. Layer some of your stickers down the middle.


 Using a straight cut, slice the border in half.


Adhere these two new borders to the edges of your page and use the rest of your double-sided paper to make mats and journaling strips!


A page layout featuring the "split the sticker' border technique

Maintain the integrity of your larger stickers by splitting them into two borders on a double page spread
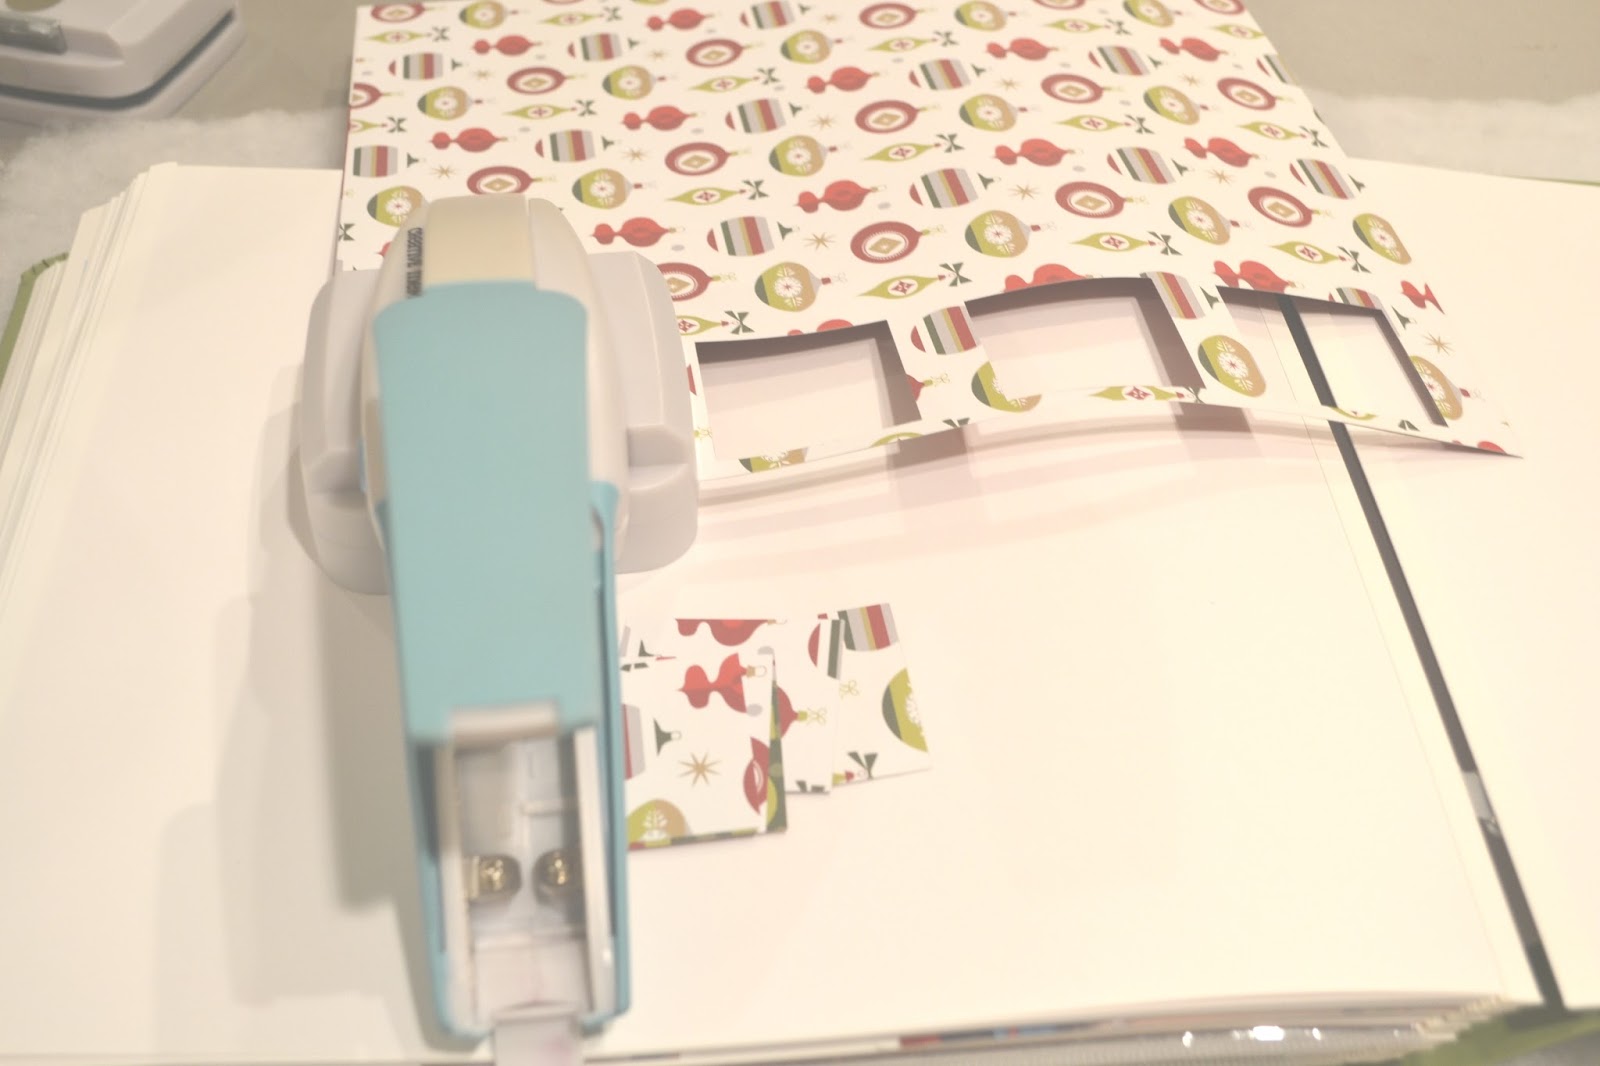
 2.) Square Frames

I take a LOT of pictures so simple pages are my thing, combined with a desire to get as many pictures on a page as possible! How would you like to see a two page layout that is beautiful, yet can still accommodate 12 photos? Coming up right up!

You will just need two different sheets of 12X12 double sided paper. Start by using the Shape Maker System with the Square punch (comes with the system)  to punch out four frames. Save the squares and repeat on a different design of  paper.


Using your straight trimmer slice the strips of frames into borders, then adhere each border to the sides of your layout. Arrange your squares in a decorative fashion on your pages, and create mats out of the rest of your paper.


Your frames will not go to waste! You can use the Square cartridge of the shape maker system to punch out faces and decorations from your favorite holiday photos and they will fit right into the squares! In this way, you can actually feature 6 photos on each page of this double sided layout. Isn't that fun?


 3.) A Simple Christmas Tree Using Circles and a Square!

I love our new Evergreen cartridge! The Border Maker System is exciting because Creative Memories keeps coming out with fun new additions to use with it. I also like our Shape Maker System (available under "Warehouse Finds" so get it while you can) because of the large Circle and Square shapes that come with it. I used each on this simple layout to make the trunk and the "branches" of the Christmas tree, and I topped it off with a large start using our Star Place 'n Punch tool (also available under "Warehouse Finds".)  Using our Shades of Red cardstock and black ABC letters I was able to beautifully record the night the entire family went to the ballet last year. A fun, easy page that is easy to recreate with the right tools.

Use the Evergreen cartridge with the Creative Memories Border Maker System and the Circle and Square cartridges with the Shape Maker System to make this fun and easy page

I hope you have enjoyed these ideas and that you will be able to use them easily incorporate them into your pages! The next stop on this blog hop is Sarah Fitzgerald with some wonderful holiday page layouts. If you started here on CelebratingYourBeautifulLife but you would like to see all of the CM Content Contributors' ideas, here is the full list of blogs (and as always don't forget to check out the CM Blog for fabulous ideas - it has been a stellar week for them!)

Have fun, happy holidays and keep scrappin'! Fran


Sunday, October 18, 2015

Halloween Blog Hop Stop #5

Welcome to Stop #5 of our Creative Memories Halloween Blog Hop! 

Isn't Halloween fun? I love being a part of this blog hop with my fellow CM Content Contributors - what a creative group of ladies! Today I am going to share some ideas I came up with a few months back that I hope you will be able to use yourself. My projects are pretty simple if you have the right tools (and I try my best to use scraps so nothing gets wasted!) Today we are going to work on some spooky Halloween faces and a two page layout featuring "Spooky Eyes." Let's get started!

Spooky faces using CM cardstock, the Shape Maker System and scraps from the Border Maker System's Film Strip cartridge  

A fun layout using CM cardstock, jewels from the Floral Embellishment kits, Gold ABC/123 letter stickers, and the fence that comes with the Border Maker System
1. Spooky Skeleton and Spooky Pumpkin

To get started, you will need the Custom Cutting System's mat and the green blade, a tape runner, and the Jumbo Hexagon Pattern. You will also need the Shape Maker System with the Square and the Fancy Circle cartridges and the Border Maker System with the Film Strip Cartridge. For paper I used our Shades of Bright and Shades of Neutral Cardstock packs to get my orange, black and white cardstock (one sheet of each.) Right now Creative Memories also has for a limited time 10 sheet packs of White and Black cardstock (not a bad idea - I know those are two colors I use a lot of!)

The CM custom cutting system, blades, mat and tape runner
                                      

Creative Memories tools: The Border Maker System and the Shape Maker System


"Shades of" cardstock packs and Flower and Jewel Embellishments


One sheet each of black, white and orange cardstock

Begin by using your Green blade to make the smallest hexagon possible with the inside of the Jumbo Hexagon Pattern. Do this with both the Orange (the pumpkin) and the White (skeleton) cardstock.


 Next, take your black sheet of cardstock and make two film strip borders. Save the scraps!


Finally, using the Shape Maker System and the rest of your sheet of black cardstock, make four Fancy Circles and two squares. Cut the squares in half to make triangles.


Assemble the pieces you have cut as follows - the Fancy Circles are the eyes, the triangles are the noses and the cheekbones, and the rectangles that were the scraps from the film strip cartridge border become the mouths. Adhere with your tape runner and voila, you have a Spooky Skeleton and a Spooky Pumpkin!

Spooky faces using CM cardstock, the Shape Maker System and scraps from the Film Strip cartridge (used with the Border Making System)
 2. Spooky Eyes

My second project came from being the mother of two boys. I loved the paper flowers and the jeweled embellishments, but struggled with how I could use them for my pages. After staring at the adhesive jewels I realized they could be used as spooky eyes staring out from the dark and that is what I did to create this fun layout! I used a sheet of grey cardstock from the Shades of Neutral cardstock pack  - the black picket fence from the Border Maker system and the Gold ABC/123 letters as a title added a little something extra!


I hope you are enjoying all of these fun ideas for your Halloween pages.  Now it's time for you to go see what Diana has brewed up for you at Stop 6 on this Blog Hop, Diana Brinsley's blog. If you started at my blog but want to see the previous Halloween ideas, here are all the links:

Stop 3 Scrappinjpegs
Stop 4 LisasWorkshop


Enjoy the rest of the blog hop and as always, keep scrappin'! Fran


Thursday, October 15, 2015

Themed Albums Part 2: Halloween

Halloween is my favorite holiday! I never miss the opportunity to make the most of it, and the beauty of the season combined with the fun decorations and costumes make for some of the best photos all year. 


While I love all holidays, there seems to be a little more frivolity and a little less work involved in Halloween as there is less pressure to travel, prepare large feasts or to select the perfect gift for people. To add to the fun, Creative Memories has launched some fun new tools, seasonal coversets, cardstock sets, ABC stickers and matching Halloween paper and sticker packs  that make it easy to get inspired to do something special with your favorite spooky memories. Before we get into the subject of themed albums, take a peek for yourself! All are available on my Creative Memories website or that of your favorite consultant.


I am in love with our 12X12 paper packs - not only are they cute and photo safe, but they are also double sided and a great value. With 12 sheets of double sided paper you get 2 of each sheet, or 12 unique designs. The matching "Trick or Treat" stickers add the perfect accent.


Creative Memories scores again with another wonderful paper pack and sticker set. The theme here is "Trick or Treat" and they are available for a limited time. 
Halloween itself is purely fun and low pressure, similar to the themed albums I am talking about in this blog series! 

This is the second in a series of blog posts on themed albums, a type of scrapbook that is near and dear to my heart as the topic is finite and you don't have to mentally change gears as often as you do with a regular "chronological" album. Two of my favorite albums under my coffee table are my Halloween and Christmas albums. I only have to work on them once a year, yet they are a great way to remember gifts,traditions and costumes and which year they took place in. With both I have created a cute start page at the beginning of the album, and then I allow myself about four sides a year in a 12X12 Creative Memories album to tell the story of each year. The hardest part of all of it is narrowing down the stack of photos to about 20 or so a year to pull this off. It takes some restraint (I take enough pictures each Halloween to complete an entire album, haha!) but the end result is worth it!


A fun start page is a great way to begin a themed album


A few favorite photos, the year and some captions are the most important elements of your Halloween pages

Journaling can either take place in a journaling box or right there on the page, but make sure to do it while the memories are still fresh

Cutting out pictures is a great way to add more pictures to a page when you are working with an 8X8 album


It's fun to show pictures of who you are dressing as!

Creative Memories' metallic pens work the best on dark paper

Have you thought about starting a Halloween themed album yourself? It's never to late to do so.  I plan to work on these books until the boys are 18 and I have figured out how many pages I can do each year to accomplish that (4 sides each year for a complete 12X12 Creative Memories album.)  Right now Creative Memories has an adorable 12X12 Halloween coverset for sale - it is limited edition so hurry and get one before it's too late! If you are hungry for more fun ideas then stay tuned for our upcoming "Halloween Page Blog Hop" on October 19th and my next blog post on themed albums will feature the holidays in December. Thanks for reading! Fran
Limited edition Creative Memories 12X12 Halloween coverset - get one while they last!  Don't forget your refill pages, page protectors and the accompanying paper and sticker pack! Click on the CM banner on the right of my blog or shop from your favorite Creative Memories' consultant's website! 
Eggplant is a supper cool color for a Halloween album - I love apple green and purple together so this new coverset is very exciting to me!